Guest post by Matthew Brown
If it isn’t obvious already, Jen is the real chef in the
house but I do like to help out and am not useless in the kitchen (or with the
camera). Every fall, we go to the Trail’s End farmer’s
market, get a bushel of Roma tomatoes and I make a pasta sauce.
I've been refining my recipe over the years. I started out
using canned tomatoes and dry herbs, but these days, fresh is best and other
than added tomato paste for a little added richness and thickness, everything
is fresh from the market or our garden.
This is what we started off with:
While you can substitute hotter or milder peppers to suit
your tastes, we started with:
1 bushel of Roma tomatoes
3 large red onions
1 ½ cups of fresh basil
9 Hungarian peppers
9 super chili peppers
18 cloves of fresh garlic
9 bay leaves
3 tablespoons of salt
1 ½ - 3 tablespoons of sugar
3 sprigs of oregano
1 sprig of fresh rosemary (or 1 ½ tablespoons of Italian seasoning)
Olive oil
First off, you need to peel all those lovely tomatoes:
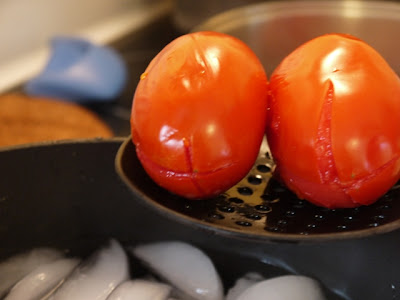
With that many tomatoes, you’d be crazy to do it just with a paring knife. Jen looked online and found that the easiest way to do it was to set up a little assembly line with a big pot of boiling water and a big pot of ice water.
Before you put the tomatoes into the boiling water, use a
knife to score an X at the bottom end of the tomato:
With the size of our pots, we could fit about 10 tomatoes at
a time into the boiling water. They only need about a minute or two in the
boiling water, then you can transfer them into the ice bath. This loosens the
skins. With some of them, you can just squeeze them and the fruit will pop
right out of the skin; others, you’ll need to give them a little help and peel
the skins off by hand or with the edge of a paring knife, but it is pretty easy
regardless.
After a little work, you’ll be left with several big bowls
of skinless tomatoes.
Before you move on to the next step, you just need to use
your handy paring knife and cut the little stem parts out, so they end up
looking like:
Next up, prepping your onions, peppers and garlic!
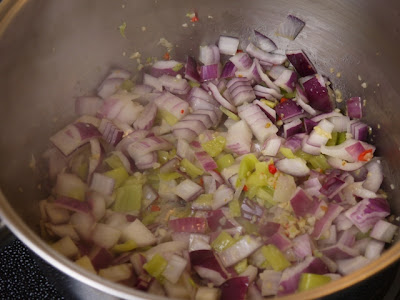
You’ll use an immersion blender later on, so the dicing doesn't need to be too precise. Considering the amount of tomatoes involved, we
needed to cook our sauce in three big pots. As I like to be organized [read:
anal retentive] in the kitchen, I ended up making three individual bowls with
equal amounts of onions and Hungarian peppers. (One large red onion and three
Hungarian peppers to each bowl.)
For the garlic and super peppers, I just used the little
chopping bowl in Jen’s handy dandy Kitchen Aid food processor to chop together
six cloves of garlic and three seeded super peppers for each batch. (Tip: super
peppers are small so they are a pain to cut open and de-seed. If you just cut
the stem end off, you can roll the pepper between your fingers and the seeds
will fall right out. Huzah!)
Now, time for some cookin’! In each of your large pots,
drizzle some olive oil into the bottoms and put them to medium-high heat. Throw
in all your onions, Hungarian peppers, garlic and super peppers and just cook
them long enough to get them softened up, so that the onions start to turn
translucent.
Once that’s done, add in all your tomatoes. Before I was
able to use the immersion blender, I used the edge of a pretty sturdy plastic flipper
(?) [Ed. Spatula?] to cut the tomatoes into smaller chunks. No need to be gentle at this stage.
Now you are ready to blend.
We’re not huge fans of big chucks of tomato in our sauce, so
I kept at it until the sauce was pretty smooth. Now you’re ready to “kicks the flavour, like Steven King writes horror”. [This is a guest post, which is
why House of Pain lyrics are allowed to be quoted.]
Chop up all that beautiful fresh basil:
I just divided it pretty evenly into the three pots and then
added one tablespoon of salt, ½ tablespoon or a little more of sugar, ½ tablespoon
of Italian season or finely chopped rosemary, a little bit of finely chopped
oregano and a drizzle of olive oil to each batch.
The bay leaf is just in that photo for artistic purposes. I
used the immersion blender again to get everything nicely mixed together, then
put the bay leaves back in while keeping it at a low simmer for about half an hour.
Since Jen already covered the canning
of her salsa verde so wonderfully, I won’t get into too much detail on the
canning, except for a few key differences.
To keep everything safe and shelf-stable, you need to use a ½
teaspoon of citric acid in the bottom of each jar.
Then, once all your lids are prepared and jars are sterilized
/ boiled and ready to go as in the salsa verde post, you’re ready to start
filling the jars.
The other key difference between the salsa verde and the
pasta sauce is the time you need to boil them after the jars are filled. Since
salsa verde has so much lime juice / citric acid, it doesn't need to boil as
long, but since we are just using the regular canning method and not a pressure
canner, and since the jars are so big, it is recommended that you keep the submerged, filled jars at a boil
for 45 minutes. Better safe than sorry, as they say.
However, in the end, it is worth the time and effort. The
sauce is delicious and I know exactly what went into it and it is something I’m
proud of. The cost of all the ingredients was probably the same as what it
would have cost me to go to the store an just buy 12 jars of decent sauce, but
that’s not really the point, is it? Not only was it fun to do, but I’m proud of
the end result and also know it is healthy and that I don’t have to add
anything extra to the sauce to make it flavorful like I would with a
store-bought sauce.
After a long-but-fun day of cooking and canning, we treated
ourselves to a nice glass of red wine and an absolutely delicious bowl of pasta
with zucchini and freshly grated parmesan.
Cheers!


No comments:
Post a Comment