Pages

 photo img_03.jpg  photo img_04.jpg  photo img_06.jpg  photo img_05.jpg  photo img_07.jpg

"A gourmet who thinks of calories is like a tart who looks at her watch." - James Beard


AOL Ad

Monday, September 14, 2020

Happy Hour at Home - Grasshopper


Chocolate mint has always been one of my favourite flavour combinations.  Recently I picked up some Creme de Menthe and Creme de Cacao to expand my cocktail options at home.  


A Grasshopper
 is an old-fashioned cocktail that I would probably never order in a bar.  When I was a kid and we'd go to a Chinese restaurant, they often had placemats with pictures of different cocktails.  The Grasshopper would be there, along with other amusingly-named drinks like the Pink Squirrel and Harvey Wallbanger.

But the Grasshopper is actually very tasty!  It makes a nice after-dinner drink, sweet and creamy like dessert.  Here's how you make one:


Ingredients

1 oz Creme de Menthe
1 oz Creme de Cacao
1 oz cream or milk

Directions

Add the ingredients to a cocktail shaker with ice.  Shake 30 seconds until chilled.  Strain into a martini glass. Garnish with a sprig of mint.


Minty, green and creamy!  Enjoy!


Saturday, July 25, 2020

Happy Hour at Home - Paloma


This is one of my all-time favourite cocktails, and it's so simple! Just tequila, grapefruit and soda, or tequila and grapefruit soda, or tequila, grapefruit, lime, sugar and soda.  I've actually had Palomas made many different ways.  

Today I squeezed grapefruit for fresh-squeezed juice, added fresh lime juice and sugar, tequila, ice and soda, with a half-salt rim and a pretty slice of grapefruit to garnish. 


When we were in Mexico last year I had a Paloma that was just tequila and Jarritos grapefruit soda with a Tajín (chili lime spice) rim and a massive grapefruit slice to garnish. 

If you can find grapefruit soda, this method is much easier, but I do love the flavour of fresh-squeezed grapefruit juice.

Here's the recipe!

Paloma Cocktail (makes one drink)

salt or chili-lime seasoning
grapefruit wedge
1/4 cup fresh-squeezed grapefruit juice
1 tablespoon fresh lime juice
1 teaspoon sugar
1/4 cup tequila 
1/4 cup club soda

Sprinkle salt or seasoning on a flat plate.  Run the grapefruit wedge around the rim of a 12oz glass and coat the rim of the glass halfway or completely in salt or seasoning. 

Add grapefruit and lime juice and sugar to the glass and stir until sugar dissolves.  Add the tequila and fill the glass with ice.  Top with club soda. 

Cheers! 


Saturday, July 18, 2020

Happy Hour at Home - Clover Club Cocktail


This cocktail has a lot to recommend it.  It has an interesting history, uses fresh berries and an egg white, and it's absolutely gorgeous to look at and very delicious. 

The cocktail dates back to 1880s Philadelphia and it was a pink drink men loved.  It's not too sweet and the egg white gives it a foamy contrasting head that looks beautiful.

First, you'll need to make a raspberry syrup, but it's easy!  This is a no-cook syrup that keeps that fresh raspberry flavour.

Raspberry Syrup 

1/2 cup raspberries (fresh or frozen)
1 cup sugar
1/2 cup water

Muddle the raspberries with the sugar. Let sit 30 minutes until syrupy. Add the water and stir until sugar is completely dissolved. Strain through a fine mesh sieve. Store leftover syrup in the fridge up to a week. 

Clover Club Cocktail (makes one drink)

1 1/2 oz gin
1/2 oz fresh lemon juice
1/2 oz dry vermouth
1/2 oz raspberry syrup
1 small egg white 

Combine ingredients in a shaker with ice and shake for 20 seconds.  Strain into a glass. 

Cheers!  


Saturday, July 11, 2020

Happy Hour at Home - Watermelon Mojito


I love making cocktails but I don't make frozen cocktails very often. Partially because they always seem overly sweet, and partially because it's just a hassle to haul out the blender and crush ice. 

But this cocktail is an exception!  It is so good, so summery and refreshing, I will definitely make it again and again.  

The trick here is frozen watermelon instead of ice.  This way the watermelon is the star, and it's not diluted by anything but liquor.  I love the way the watermelon's colour just says SUMMER!

The recipe comes from Smitten Kitchen, a great resource for well-tested food and drink recipes.  

Here's how to make this fabulous summer treat:

Frozen Watermelon Mojito Recipe (makes 2 drinks)

1 lb frozen watermelon 
1/2 cup fresh squeezed lime juice (about 3 limes)
1 tablespoon sugar
4 oz rum
10 mint leaves, plus sprigs for garnish

To freeze the watermelon, remove the rind from one small or 1/2 a large watermelon. Remove seeds if necessary and cut into 1-inch cubes. Freeze in a single layer on a tray lined with plastic wrap or parchment for at least one hour.  Save any leftover frozen watermelon in a zip-top bag in the freezer.

To make the cocktail, mix the lime juice and sugar until the sugar dissolves. Blend the frozen watermelon, lime juice and rum in a blender until smooth.  Add the mint leaves and blend briefly until chopped. 

Serve in a roomy glass with a straw, garnished with a mint sprig. Cheers!


Saturday, June 20, 2020

Happy Hour at Home - Montparnasse Cocktail


This cocktail is a real find!  I'm obsessed with Calvados and love to find new ways to use it.  I learned about this cocktail from David Lebovitz's blog and Instagram, where he has been posting French cocktails.

I have a dream to go to Normandy where Calvados is made (and to Brittany where the similar Lambig apple brandy is made).  Until then I'll enjoy this cocktail.

Here's how I made it.


Montparnasse Cocktail Recipe

1.5 oz Calvados
0.75 oz elderflower liqueur
0.5 oz lemon juice
0.5 oz sparkling hard cider
Garnish:  apple slice 

Combine the Calvados, elderflower liqueur and lemon juice in a cocktail shaker with ice
Shake until well chilled
Pour into a cocktail glass and top with cider
Garnish with an apple slice


Happy Hour at Home - Pimm's Cup


Sometimes I can be resistant to buying a bottle of alcohol just for one cocktail recipe. It seems wasteful and expensive. So I resisted buying Pimm's for a while, but I'm so glad I took the plunge. 

Pimm's No.1 Cup is an unusual gin-based liqueur with herbs. It is traditionally served at British events like Wimbledon. Some Pimm's Cup recipes you see might call for lemonade, but that's British lemonade, which is more like Sprite or 7-Up.  I made my Pimm's Cup with ginger ale, which is an acceptable substitute. 

Muddling cucumber and lemon in the drink makes it even more refreshing. I've seen some recipes call for muddled strawberries as well, which seems a little overboard, but I might try it next time!  I love to garnish the drink with long strips of Persian cucumber, thinly sliced lengthwise to curl around the inside of the glass. 

You can hardly ask for a more refreshing summer cocktail than a Pimm's Cup.  Pimm's is pretty easy to find at the LCBO, and not too pricey, so I'd recommend picking some up!

Pimm's Cup Recipe

1/2-inch chunk of cucumber
1 lemon wedge
2 oz Pimm's No.1
4 oz lemon-lime soda or ginger ale
Garnish: lemon wheel, cucumber

Gently muddle the cucumber and lemon in a tall glass with a wooden spoon or cocktail muddler.
Pour in the Pimm's and soda and stir to combine.  
Garnish with cucumber and lemon.


Saturday, June 13, 2020

Happy Hour at Home - Sidecar


I haven't been doing much cooking lately, so I haven't had food posts to share, but I have been making cocktails a lot more frequently so I thought I could share those.

The Sidecar is one of my very favourites.  For the longest time I didn't have cognac at home, but I splurged on a bottle to make these, as well as another favourite - Champagne cocktails. 

A Sidecar is simply cognac, orange liqueur and lemon juice.  I use Triple Sec as my orange liqueur, but you can use Cointreau or Dry Curacao if you prefer. 

Some folks add simple syrup and some like a sugared or half-sugared rim on their Sidecar, but I don't think it's necessary.  

As for Cognac, it can be pricey but it is nice to have in a well-stocked bar. Cognac is a type of brandy made from distilled white wine. It is labled VS, VSOP or XO based on hoe long it is aged (2, 4 or 10 years).  VS Cognac (the least expensive) is fine for mixed drinks, in my opinion. You can also use Armagnac which can be less expensive. 

You'll find recipes with different ratios of cognac to orange liqueur and lemon juice.  This is the mix I prefer.

Sidecar Recipe

2 oz Cognac
1 oz Triple Sec or Cointreau
3/4 oz lemon juice

Add cognac, triple sec and lemon juice to a cocktail shaker filled with ice.
Shake well until chilled.
Strain into coupe glasses and garnish with a twist of lemon.


Tuesday, April 21, 2020

Quarantine Meatballs

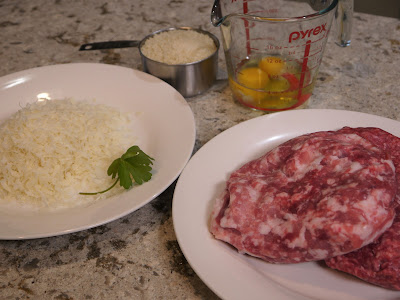
meatball ingredients

This post is by Matt, the Beer Baron

When she isn’t being awesome in the kitchen, the Clockwatching Tart actually works for a local health unit, which means she is incredibly busy at the moment. Between that and the ongoing COVID-19 pandemic, cooking has been a bit of a challenge lately. 

One thing that has definitely helped us out has been a delivery service from one of our favourite local restaurants, Grace. Rather than deliver actual meals, Grace has rebranded as Grace Pantry during this time of physical distancing and is using their connections in the food industry to deliver an amazing selection of locally sourced meats, produce and other tasty treats. You can check out their online store here.

When I was unpacking our very first order from Grace Pantry, I was blown away by how beautiful the ground pork from Stonecroft Farms looked. I wanted to do something special with it, so I decided to try a variation of my favourite recipe for meatballs from Anne Burrell. 

ground pork and ground beef

I don’t normally refer to ground pork as “pretty”, but there’s the evidence. For my version of the recipe above, I just omitted the veal, substituted dried parsley for fresh (we are in a pandemic, after all), and used more than a cup of parmigiano (pandemic or not, I like what I like). 


Another interesting note about cooking in the age of a pandemic is the absolutely bonkers number of onions I go through in a week. I suppose it is because I have all the time in the world, so I’m making everything from scratch, which often includes onions in one form or another. Luckily, I love dicing onions. I find it soothing and the OCD part of my brain enjoys the symmetry of the process.


While I love garlic, I wouldn’t call the process of smashing it with the flat blade of a knife soothing, but it is certainly satisfying.

making meatballs

When I have the luxury of time, prep work is my absolute favourite part of cooking. It’s obviously the OCD thing, but having nicely diced ingredients all out in their own little bowls or own their own little plates is a very satisfying feeling. 

meatballs

While the Clockwatching Tart tends to individually weigh her meatballs on a kitchen scale, I opted to just eyeball it and am pretty proud of how they all turned out. I suppose I missed my true calling in meatball forming. C’est la vie.

meatballs

Apart from quality ingredients, it is how you cook them that really brings out the flavour in these meatballs. Searing each side as best you can in the frying pan before they get finished off in the oven adds so much flavour.

meatballs

These photos are about two weeks old as I write this post and oddly enough, we had some store bought meatballs for lunch today and I was so disappointed with them that I wanted to throw them out. That is how good these homemade meatballs are in comparison.

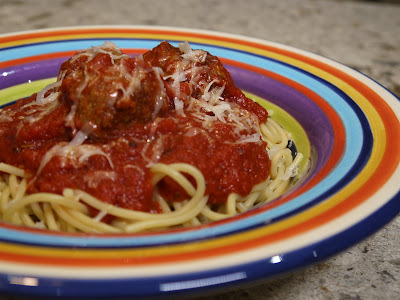
spaghetti & meatballs

Cheers to wonderful comfort food and finding the silver lining during strange times. (And a shout out to Grace Pantry for their awesome, contact-free delivery.)


Saturday, April 11, 2020

Homemade Bagels


I see so many people posting online about getting into baking and I love it!  The circumstances are unfortunate, but there's no better time to bake. I've always found baking so relaxing and satisfying. It gives you a sense of accomplishment, and delicious smells and tastes to enjoy. 

I've been extremely busy with work lately, so Matt has been doing all the cooking.  We've had some wonderful meals and I'm able to focus on work without worrying about planning and shopping. 


I finally had a real day off and decided to make these bagels. It's actually a 2-day process.  Make and shape the dough the first day, let it rise in the fridge for 24 hours, then boil and bake the second day.  


Warm fresh bagels just out of the oven are well worth the wait!  


We had them with plain cream cheese, but next time I'll add fresh chives or minced red onion.  


To make bagels you need a few special ingredients and items that may not be in everyone's kitchen.  They use bread flour (hard flour) not All-Purpose flour.  They also need instant yeast, not active dry or rapid rise yeast.  The recipe also calls for barley malt syrup.  I found one jar on Amazon.  It was expensive but I was going to go for it.  Unfortunately it was sold out by the time I tried to check out.  I used brown sugar instead and had a dark, crunchy crust on my bagels.

The recipe I used is from Serious Eats, by Stella Parks at BraveTart.  The method uses a Yukone, flour and water cooked on the stove to make the bagels brown and crisp. It's then added to flour, salt, sugar and yeast in a food processor with water to make a very stiff dough.  My food processor struggled a little because the dough was so stiff, but it came together in the end. 

The most challenging part for me was rolling out the dough balls. I had a hard time getting them smooth without seams. But the final bagels turned out ok.  

Poking the hole in the dough to make the bagel shape was the fun part.  The bagels then sit overnight in the fridge. 

Boiling and baking is quick and easy.  My bagels were dark golden brown after only 23 minutes in the oven. I also added Everything Bagel Seasoning to two of the bagels, and left the rest plain. 

The recipe makes just 8 small-ish bagels, which was perfect for us. The bagels turned out nicely.  I would like to try again with the barley malt syrup to see if it makes a difference.  

I recommend reading the whole story on Serious Eats before making the bagels. There's also a video.  But this was a very simple, satisfying baking project!


Saturday, February 22, 2020

Pan Pizza

Cast iron Pizza

It's been a long time since I've made a new blog post, but I just had to share this amazing technique for making the best homemade pizza we've ever had!

I've tried many homemade pizza recipes. I bought a pizza stone and pizza peel, but still can't get the pizza to slide onto the stone easily. I've tried to make grilled pizza too. The homemade pizzas I've tried in the past are ok, but definitely better than delivery, and therefore not really worth the effort. 

But this recipe is different!  It's pretty easy, but if you make your own dough from scratch, it takes some planning. Instead, you could just buy pizza dough from a local bakery and make this in a flash!

The recipe makes a relatively thick-crust pan pizza that's a little greasy and unbelievably delicious.  Matt asked why he had to wait 43 years to try such a tasty pizza at home. 

You will need a cast iron pan.  Or two if you want to make two pizzas. You may be able to substitute a 10-inch metal cake pan, but I didn't try that.  

If you're making the dough from scratch it's very easy, but you need to start it the day before.  Mix flour, yeast, oil and water, let it rise and you're done.  Put the dough in the pan two hours before you bake the pizza for a final rise. 

I used a store-bought jar of marinara sauce as my pizza sauce, and it was just fine.  I topped it with only cheese and pepperoni, but you can use any toppings you like. 

Set the oven to its highest temperature and bake the pizza for about 15 minutes.  If the crust isn't browned on the bottom, use the stovetop to crisp it up for 2 minutes more.

The result is the best pizza I've ever made. It's highly recommended you try this!

pan pizza


Here's the recipe, adapted from Serious Eats.

For the crust:
2.5 cups (400g) bread flour
2 teaspoons (10g) kosher salt
1 teaspoon (4g) instant yeast
1 cup + 3 tablespoons (275g) water
2 teaspoons (8g) olive oil

Mix the crust ingredients in a large bowl until dry ingredients are incorporated. Cover the bowl tightly with plastic wrap and let sit at room temperature for 18-24 hours. My kitchen is cold, so I put the bowl in my turned-off gas oven overnight.  

For one pizza:
10-inch cast iron pan
Pizza dough
Olive oil
3/4 cup pizza sauce
225g shredded mozzarella
Pepperoni and/or other toppings as desired

Two hours before you want pizza, divide the dough into two equal pieces. (You can use store-bought dough or the recipe above.)

Form each half of the dough into a ball, adding flour to keep it from sticking to your hands or the counter.  If making one pizza, refrigerate or freeze the other half of the dough in a plastic bag. 

Spread a tablespoon of olive oil in your cast iron pan. Place the ball of dough in the pan and turn to coat with oil.  Use your hands to spread the dough into the pan, flattening it as much as possible to the edges of the pan. Cover with plastic wrap and let it rise for two hours.

Pre-heat your oven as high as it will go. Mine goes to 500 degrees, but if you can do 525 or 550, that's even better.  

The dough should have risen and spread to the edges of the pan.  Use your fingers to press the dough to the edges and pop any air bubbles you see.  

Spread the pizza sauce over the dough, all the way to the edges. 

Spread the shredded cheese evenly over the dough, all the way to the edges.

Top with pepperoni or toppings of your choice.

Bake in the pre-heated oven for 12-15 minutes until the top is golden and bubbling. 

Remove pan from the oven and use a spatula to lift the pizza and check the bottom crust.  It should be brown and crisp.  If it's still white, put the pan on a burner and cook over high heat for a minute or two until the bottom crust is brown and crisp.

Remove the pizza from the pan, cut into 6 pieces and serve.  

Enjoy!