Pages

 photo img_03.jpg  photo img_04.jpg  photo img_06.jpg  photo img_05.jpg  photo img_07.jpg

"A gourmet who thinks of calories is like a tart who looks at her watch." - James Beard


AOL Ad

Showing posts with label make-ahead. Show all posts

Sunday, February 4, 2018

Banana Pudding

Banana Pudding

A few years ago we took a trip to Nashville and tried Banana Pudding for the first time.  It's an iconic Southern dessert that's simple to make and very comforting!

Glazed ham with pineapple

Recently for Matt's birthday dinner his wish was to have an old school glazed ham with pineapple and cherries. I served it with scalloped potatoes and black-eyed peas, and banana pudding for dessert. 

scalloped potatoes

It was a great meal.  The banana pudding should be made in advance, so it's a great dessert for a dinner party.  The wafers soften in the custard and make a lovely-textured treat.  You can assemble it the day before for the best texture. 

banana pudding

I used this recipe from Smitten Kitchen as inspiration, but I didn't make my own vanilla wafers, I used store-bought Nilla Wafers


Making the custard is the most challenging part, but it's pretty simple.


Definitely try this simple, fun dessert! 


Here's how to make it:

Ingredients
6  egg yolks
3⁄4 cup granulated sugar
1⁄4 cup cornstarch
1⁄4 teaspoon salt
3 1⁄2 cups whole milk
2 tablespoons butter
1 tablespoon vanilla extract
1 tablespoon bourbon
4 ripe bananas
1⁄2 cup whipping cream
2 tablespoons sugar
2 tablespoons bourbon

Equipment:  8 6-oz ramekins or jelly jars for serving

Instructions
To make the custard, place the egg yolks, sugar, cornstarch and salt in a medium pot. Whisk them together, then whisk in the milk in a slow stream until combined.  Place the pot over medium heat and bring to a simmer while stirring.  I like to use a rubber spatula for this.  Keep stirring as it simmers for about 5 minutes until the custard thickens enough to coat the back of a spoon.  Once thick, remove from heat and whisk in butter, vanilla and bourbon. Place plastic wrap on the surface of the custard and chill for 4 hours or overnight.  

Nilla wafers

To assemble, place wafers in a layer in the bottom of each ramekin.  You can also make this in one big dish if you don't have individual serving dishes.  You may need to break some cookies to make a full layer, that's ok! 

On top of the wafers, dollop a layer of custard, then a layer of sliced bananas.  Repeat with a layer of wafers, custard and bananas until all the bananas and custard are used up.  Cover the dishes and refrigerate for at least 4 hours, but even better overnight.  

banana pudding

When ready to serve, whip cream with sugar and bourbon until soft peaks form.  Dollop whipped cream on top of puddings and place a Nilla wafer on top.  

Creamy, rich and not too sweet. This is a perfect dessert! Enjoy. 


Sunday, February 9, 2014

Lazy Cabbage Rolls


I can't say cabbage rolls have always been my favourite.  My family has cabbage rolls every year at Thanksgiving and Christmas, along with pierogies, meat sticks (breaded pork skewers), and turkey, stuffing, mashed potatoes, etc.  With all that deliciousness, the cabbage rolls are not the first thing on my plate.  And they always seemed complicated to make outside the holidays.

But these "lazy" cabbage rolls are pretty easy.  They are actually like mini-meat loafs. The recipe makes a whole bunch so I froze half and cooked them later and it made a fantastic quick weeknight dinner.  


Here's what you need for the cabbage rolls:

Tuesday, November 27, 2012

Poached Shrimp Cocktail & Shrimp Stock


If you ever buy those frozen shrimp rings at the grocery store, consider this instead. Poaching your own shrimp gives you such a nice, fresh flavour, plus the opportunity to make useful shrimp stock from the shells.  And it's so easy!


All you need is some frozen raw shrimp and some aromatics.


This is the shrimp I used, but any large, raw, shell-on shrimp is fine.  This is a great resource for finding out about sustainable seafood.  I'll admit, I didn't use it this time.


Fill a large, shallow pan with about an inch of water and add a bay leaf, garlic clove, a few peppercorns and a sprinkle of chili flakes.  Bring the water to a simmer and add the frozen shrimp in their shells.


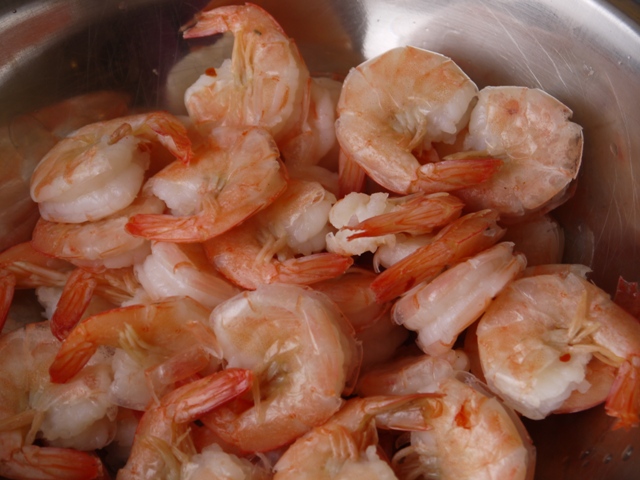
As the water starts to come back to a simmer, the shrimp will start to turn pink.  Flip them over as they become opaque.  They only need about 3-4 minutes.  


Once they're just cooked through, remove them from the water with a slotted spoon or tongs and reserve the poaching liquid for your stock.  Cooking shrimp in their shells gives them way more flavour than peeling them first.


To make shrimp cocktail, chill the shrimp and peel them but leave the tails on.


You can make an easy cocktail sauce with a tablespoon of horseradish, two tablespoons of ketchup and a few dashes of Tabasco sauce to taste.  Serve on a platter with sliced lemon or in little cocktail glasses for an individual appetizer.  


That's diced celery and celery leaves at the bottom of the glass.  You can make these in advance and chill them in the fridge until guests arrive. 


But save the shrimp shells!  We're going to make a flavourful shrimp stock you can keep in the freezer and use in lobster bisque or any recipe that calls for fish stock.  


In a medium pot, heat a little oil and add a celery stalk and the white parts of a couple of green onions or a quarter of a small white onion.  


Add the shrimp shells and stir, cooking for about a minute.


Cover with water and throw in the shrimp poaching liquid. Bring to a boil.  Reduce heat and simmer uncovered for about 20-30 minutes until reduced by about half.


Strain out the solids and place the stock in a freezer container.


I ended up with exactly 2 cups and put it in the freezer for next time I need a little flavour in a soup.  Next time I'll show you what you can do with the rest of the poached shrimp.  

Friday, September 14, 2012

Braised Lamb


Super cheap lamb shoulder chops at the supermarket led me to this absolutely stunning lamb dish. The recipe calls for lamb shanks but the chops worked beautifully.  I'll tell you about the beans tomorrow.  


As you can see, the lamb itself only cost around $5 for four chops. I bought four because the chops were pretty thin but the meat was so rich we could only eat half of it.  

In addition you'll need:

  • 2 celery stalks
  • 1 carrot
  • 1 onion
  • 8 (!) garlic cloves
  • some thyme
  • 1 bottle red wine
  • 1 carton chicken stock (3-4 cups)
  • 1 tablespoon tomato paste
  • olive oil, salt and pepper


Heat the oil in an oven-safe casserole or enamelled cast-iron pot.  


Sprinkle the chops on both sides with salt and pepper and add to the hot pan.


After 2 minutes or so, when the lamb is browned, flip to brown the other side.


I browned these in batches, two at a time, so they wouldn't be crowded in the pan.  Once browned, remove to a plate.


Now coarsely chop the carrot, onion, garlic and celery.


And add to the pan.


Once the veggies are softened, pour in the wine. You can use about 3 cups or a whole bottle.  


Bring the wine to a simmer and add the chicken stock and tomato paste, then add the lamb back to the pot.
Put the lid on the pot and pop it into a 350 degree oven for about 2 hours.  When it's done it'll look like this:


The liquid has reduced and the lamb is falling off the bone.  Now you can proceed in one of two ways. You can use a spoon to skim the fat off the sauce, remove the lamb, strain the sauce and serve tonight...


OR you can put the whole thing in the fridge overnight letting the fat solidify for easy removal and giving you a warm, delicious, fancy weeknight dinner that heats up in minutes.


As you can see, I chose the latter.
It's a little tricky to scoop the fat when the meat is not totally submerged, but it's still way easier than doing it while it's hot. And letting it sit overnight does wonders for the flavours.


Once you've removed as much fat as you can, place the covered pot back in the oven for about 30 minutes to warm through.  Meanwhile make your beans and gremolata which I'll tell you about next time.


Once warmed through, remove the lamb from the oven.


Remove the lamb from the pot and cover to keep warm, then strain the sauce into a smaller saucepan and discard the solids (bones, carrots, etc.)


Let the sauce simmer and reduce for about 5 minutes, then add a bit of butter and salt and pepper.  The butter is optional but that's what the pros do and it adds new richness to the sauce.


Serve the lamb drizzled with the sauce and topped with fresh gremolata.  

This is a great main dish but wait until you hear about the whole meal!


Tuesday, May 29, 2012

Bean Burritos

I'm not a big fans of beans but my husband loves them. We made a huge batch of bean burritos for the freezer so he can take one to work for lunch every day. 

I use this technique for cooking the beans. You don't need to pre-soak them overnight. Just bring a pound of dried beans covered in water and a bit of salt to a boil on the stovetop, cover and place in a 250 degree oven for about 75-90 minutes until tender.  


Cooking dry beans gives a nicer texture and flavour than canned beans. I use pinto beans which are so healthy for you! They have tons of fibre and protein.  


Once the beans are cooked, saute some onions, jalapeno and chipotle peppers in a little oil and then add the beans and mash together. 


You can also add some beer or stock or water at this point to get the beans to the right texture.


Once the beans are somewhat smooth, or whatever texture you prefer, prepare the other ingredients.


You can just use beans or add rice, corn or whatever you like.  


We added rice and corn to this batch.
At our local farmers market we get these great whole wheat tortillas made by Mennonite farmers from just outside town. 


Spread a couple of tablespoons of the bean & rice mixture on the tortilla...


...top with cheese...


...and roll up.


Package them for the freezer by wrapping them individually in plastic wrap. Posing with a superhero is optional.  


Microwave the frozen burrito for about 1 minute, or 30 seconds if it is thawed.