Pages

 photo img_03.jpg  photo img_04.jpg  photo img_06.jpg  photo img_05.jpg  photo img_07.jpg

"A gourmet who thinks of calories is like a tart who looks at her watch." - James Beard


AOL Ad

Sunday, January 15, 2012

Short & Sweet Sunday - Slow Roast Beef

I was under the weather and very busy this week so didn't cook or photograph much food.  This week's Short & Sweet Sunday is an excuse to use an incomplete photo set from a roast beef dinner last week.  I took some prep pictures, but once I put it in the oven, things went a bit haywire and I didn't take any pictures of the food once it was cooked. 

This is a great method for roast beef.  It doesn't give you a brown crust, but the meat is the same temperature and colour all the way through, making for delicious, tender results.

Preheat the oven to a low 280 degrees Fahrenheit.

Let the roast sit at room temperature for about an hour before cooking.  I used a sirloin tip roast this time.

Since it won't be seared, I like to rub the whole roast with a mixture of chopped garlic, rosemary, thyme, olive oil and salt and pepper.  


Cooking at such a low temperature takes a while.  This one was about 3 lbs and took about two and a half hours.  


Often I'll make mashed potatoes with this roast because I normally roast potatoes at 400 to get them nice and crispy, but this time I put some potatoes in at the same time and the roast and then turned the heat up once I took the roast out to rest.  It worked pretty well to give them some crisp crust.

I took the beef out when it was at 140 degrees and let it rest, then sliced it thin with an electric knife and served it with the potatoes, some green beans and lots of horseradish.  

The beef was pink all the way through - tender and delicious.  


One Important Lesson Learned:
  • Whatever you do, don't leave the meat thermometer in the roast when you put it back in the oven!  Of course this was just a silly mistake, but the plastic thermometer casing started to melt and smoke and could have ruined the whole meal if I hadn't caught it in time.  Plus, that's the reason I don't have any pictures of the finished meal - it threw me totally off track.  


Tuesday, January 10, 2012

Easy & Fancy Rack of Lamb for Two


On Sundays, especially in the winter, I like to put a little extra effort into dinner.  This often means I'll roast a chicken or some beef, or occasionally make a stew.  I've been wanting to make lamb for a while but it is generally so large and expensive when I see it in stores.  Finally I found a nice little rack of lamb for about seventeen dollars.  It was frozen, but only weighed 500g so it took no time at all to thaw.


I found this recipe on the awesome Epicurious for rack of lamb for two. I love it when the portion size is just what I need - no math!

I sliced up the potatoes:


... and shallots:


... and made a paste of garlic, rosemary, thyme, salt and pepper:


(I miraculously still have rosemary and thyme growing/living in my garden. I'm wondering how much longer it will last.)


I heated some oil in my cast iron pan.


Then browned the lamb for a few minutes.


Once it was nice and brown I removed it from the pan, drained the oil and browned the potatoes and shallots for a few minutes.  I had too many potatoes, so they didn't brown as much as I would have liked.  The shallots, however, browned more than enough.


Once this was done, I added some herb mixture and water to the potatoes and then topped them with the lamb.  Then I spread the remaining herb mixture over the lamb...


... and popped the whole thing in the oven.

The recipe called for roasted tomatoes as well, but we are not fans of that nonsense.  I roasted the lamb and potatoes for 20 minutes and then pulled out the lamb for testing.  The thermometer said 140 exactly so I let it rest and tossed the potatoes back in to try to get them more browned. 


I steamed some yellow beans while the lamb rested. 


I wasn't totally sure what to expect, but when I sliced the lamb, I was over the moon!


Absolutely perfectly cooked!  


Beautiful!

I served it up with yellow beans and lots of potatoes.


Cooking the lamb on top of the potatoes gave them such incredible flavour. They may be the best potatoes I've ever had. I barely missed the crispy exterior.  

This dinner was amazing. Especially considering the amount of effort it took. It is perfect for a Sunday dinner or special occasion, but easy and quick enough for a weeknight. If only lamb was on sale all the time!


Enjoy!

*Pictures updated in 2016


Monday, January 9, 2012

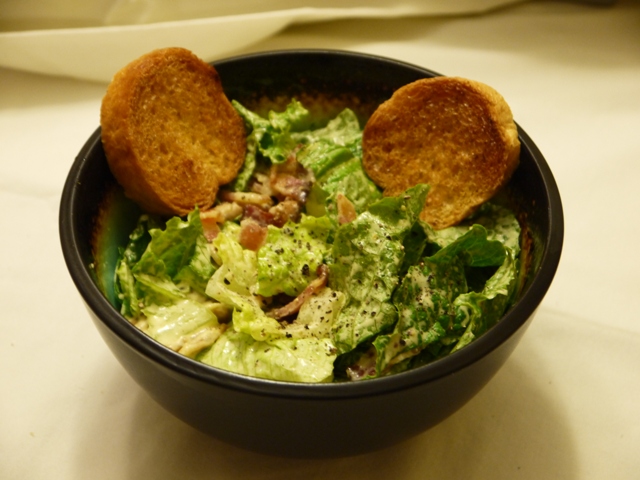
To Do: Make Caesar Salad from Scratch

Around here, stores sell a very popular bottled Caesar salad dressing called "Renee's" that many people use exclusively.  I think there's a creamy version and a vinaigrette version. It tastes ok: parmesan and pepper flavour, mostly.  But have you ever made Caesar dressing from scratch?  It is a whole new world!


Of course it is a little more labour intensive than opening one jar, but it is so worth it! You'll need to get over any reservations you may have about raw eggs and anchovies. Just make sure your eggs are fresh. Anchovies are amazing flavour enhancers.  


Look at those anchovies!


And the egg yolk!

My inspiration is this recipe from Martha Stewart.  Here's what you need:

  • 4 slices bacon, cooked and chopped
  • 2 garlic cloves 
  • 12 slices baguette (1/4 inch thick)
  • 1/4 cup olive oil, plus 1 tablespoon
  • Coarse salt and freshly ground pepper
  • 2 oil-packed anchovy fillets
  • 1 large egg yolk
  • 1/4 cup finely grated Parmigiano-Reggiano cheese
  • 2 tablespoons fresh lemon juice
  • 1 teaspoon Dijon mustard
  • 1 dash Worcestershire sauce
  • 1 head romaine lettuce, chopped 

For the croutons, rub a garlic clove over the baguette slices and brush them with olive oil. Bake at 350 degrees for about 10 minutes.

Meanwhile throw the rest of the ingredients (except oil and romaine) into a food processor or blender.  


Turn on the blender or processor and drizzle in the oil while it's running.  


Meanwhile toss the bacon with the romaine.  Drizzle the dressing over and toss to combine.  


I like to serve it with just a couple of whole toasted baguette slices, but you can break them up like traditional croutons if you prefer.  Or add a lemon slice and parmesan shavings.  Go crazy!

Not too difficult and so worth the effort!


Food lessons learned:
  • Watch those croutons! They will brown too much on the bottom if you're not careful
  • Crispy bacon is best. Feel free to cook extra at breakfast and save some for this
Photography lessons learned:
  • I wouldn't say I learned much here.  I know I want to have better lighting in these photos, but haven't figured out the trick yet


Sunday, January 8, 2012

Short & Sweet Sunday

Why not have a theme day?  This week I've done a few in depth photo series of meals and I plan to have some more detailed posts next week, but here's a little taste of what we ate this week, with limited commentary.  


Grilled Pork, Sage Potatoes and Sweet Potatoes, Lentils and Roasted Brussels Sprouts


This was a tasty meal.  The weather was unseasonably mild and we found some nice boneless sirloin pork chops at Costco.  We grilled them up and I made some roasted brussels sprouts on the side.  I just roast them with salt, pepper and garlic powder for about 30 minutes.  


I also added this sprouted lentil blend I found for something a little healthy.  But the real star of the dish was the potatoes.  I don't normally mix regular potatoes and sweet potatoes, and when I roast either one, I generally use lots of spices, but this time I kept it very simple...


Just potatoes, sweet potatoes, olive oil, salt and fresh sage.  I roasted them for 40 minutes and tossed them around a couple of times.  They were so delicious!


This dish really showed off the differences between sweet potatoes and regular potatoes.  The sage seemed to make the sweet potatoes taste sweeter.  


But it gave the potatoes this awesome herbal savory flavour.  I loved them both but I think the potatoes had a slight edge because they were so golden and crispy!


Happy weekend!  Looking forward to an exciting new week of food and pictures!


Friday, January 6, 2012

My Perfect Margarita

I love margaritas.  I love tequila and I'm trying - on a budget - to become enough of a connoisseur to distinguish between the different kinds.  


A really good margarita is a treat for me.  So this holiday season, I decided to do a little research and put some nice tequila and my new blender to use and make a delicious margarita on the rocks.


I started by cutting up some citrus fruit.  I thought I'd use the clementines but didn't end up using them.  I juiced them anyway because I loved the colour.


Even with my brutal photography, how could you resist?  I think these citrus shots are the worst yet!


Here's a blood and guts shot of the juice and rinds. 2 limes gave me about 2/3 cup of juice.


I got this pretty new blender for Christmas after 20 years (!) with a crappy old one. This one had way more ice-crushing power than I expected.  I ended up with sno-cone level ice after just a few pulses, so I had to start over and make cracked/crushed ice for the shaker and the rocks.


These are my booze ingredients.  The clerk at a USA liquor store recommended this tequila.  It is cheaper than Patron and I like it quite a bit. I got anejo because it's for sipping, not just for mixing. A clear tequila would make the drink prettier, but I loved the flavour here.


I read in my research that some people prefer triple sec over Cointreau because it is less complex and lets the tequila flavour shine through. Good thing that's what I had! There was more triple sec in the recipe than I expected, but I liked the balance.  


Here's what you put in the shaker for 2 drinks:

  • Cracked ice
  • 3oz el Mayor Anejo tequila
  • 2 oz triple sec
  • 2/3 cup fresh lime juice


Shake with ice and serve over crushed ice. Salt rim if desired.  I like the salt but my husband does not.


This is a very boozy drink, so one was enough for us but it is so delicious you may want another round.


Yum! I found my perfect cocktail!

Thursday, January 5, 2012

Simple Seafood Pasta for New Years

My husband's birthday is on December 30th, so to make up for decades of conflation with Christmas and New Years, we always celebrate on the 30th and have a quiet night in on the 31st. Often we are suffering from too much cheer the night before, but this year we had a little pep left in us, so I planned a simple seafood pasta dinner.  (I say I planned because due to a late lunch I didn't end up executing it until dinner the next day.)  It is a very, very easy recipe, based on this one from Epicurious, but the seafood makes it a little fancy and you can use just about any seafood you like.  


Aside from the seafood, you need olive oil, garlic, chili flakes, white wine, tomato sauce, parsley and linguine.  


I used bay scallops, large raw shrimp (not jumbo) and a couple of small lobster tails this time.  I've made it with just shrimp and scallops; calamari, shrimp and scallops; even mussels or clams with the shrimp and scallops.  


Boil your water and add your linguine to the pot. I add lots and lots of salt.  Like 2 tablespoons.


If you chop the garlic and shell the seafood before you put the pasta in the water, the sauce and seafood will be done by the time the pasta is cooked.  

Saute the garlic in the olive oil with the chili flakes.  

After a minute or two, add the wine.  If you're using clams or mussels, add them now.  Otherwise let the wine cook for a minute or two and add the tomato sauce.  

Simmer for another minute or two and add the seafood about 4 minutes before the pasta is done.  Let it simmer lightly until the shrimp is pink and the scallops are opaque.  

Once the linguine is done, drain it and add it to the large pan with the seafood and sauce.  Toss with the parsley and serve it up!


This recipe is so quick and easy it surprises me every time.  It is delicious and a little fancy too.  So you can have it on a special occasion like New Years Eve, or get tipsy and snacky and forget about it until New Years Day, or just have it on some random Tuesday night.  


Food Lessons Learned:
  • Not much this time since this is a tried and true recipe, but I guess don't plan a semi-fancy dinner then have a huge lunch at 4pm, then start drinking. Because the chances of making even a simple recipe get pretty slim by that point

Photography Lessons Learned:
  • First, don't balance your box of linguine against your glass of wine for the cast photo. That's just asking for trouble
  • Also, it isn't so easy to take pictures of all the steps, especially with a quickie recipe like this
  • Finally, I figured out how to re-size the photos so hopefully that'll save some time.


Sunday, January 1, 2012

Blueberry Waffles

For Christmas our good friends gave us a fancy waffle iron.  


It is probably more waffle iron than we need, but it is a very nice one.  


I mixed up some waffle batter from a boxed mix (PC Blue Menu Whole Grain pancake and waffle mix). 


 I had to add 2 eggs, 1 1/3 cup of milk and 2 tbsp oil to the mix.  I also added about 1/2 a cup of frozen wild blueberries.


I mixed it with a fork and used the measure that came with the waffle iron to pour the batter into the preheated machine.  


Then closed the lid and waited until the waffle iron binged.  I set the dial to 4 as instructed.  

The first waffle did not turn out.  It stuck to the top and bottom and the uncooked insides were a real pain to scrape out of the waffle iron.  I wish I had taken a picture, but I didn't.


For the second waffle, I used more non-stick spray and it turned out fine.  It was still a little less crispy than we'd like so for the next one I turned the dial to 5 and left it for a few seconds after the bing.  It was nice and crispy.


Served with grade B maple syrup and some applewood-smoked bacon I cooked in the oven, which was also a touch underdone but tasted delicious.


Food lessons learned:
  • One batch of mix makes 4 waffles unless you mess the first one up
  • Be sure to use enough cooking spray in the waffle iron
  • Crank up the heat setting for more well done waffles
  • Plain/buttermilk waffle mix tastes better than whole grain

Photography lessons learned:
  • Take pictures of mistakes too!
  • Try not to get my shadow in the shot (but how?)
  • Make these pictures smaller. They are huge and take ages to upload